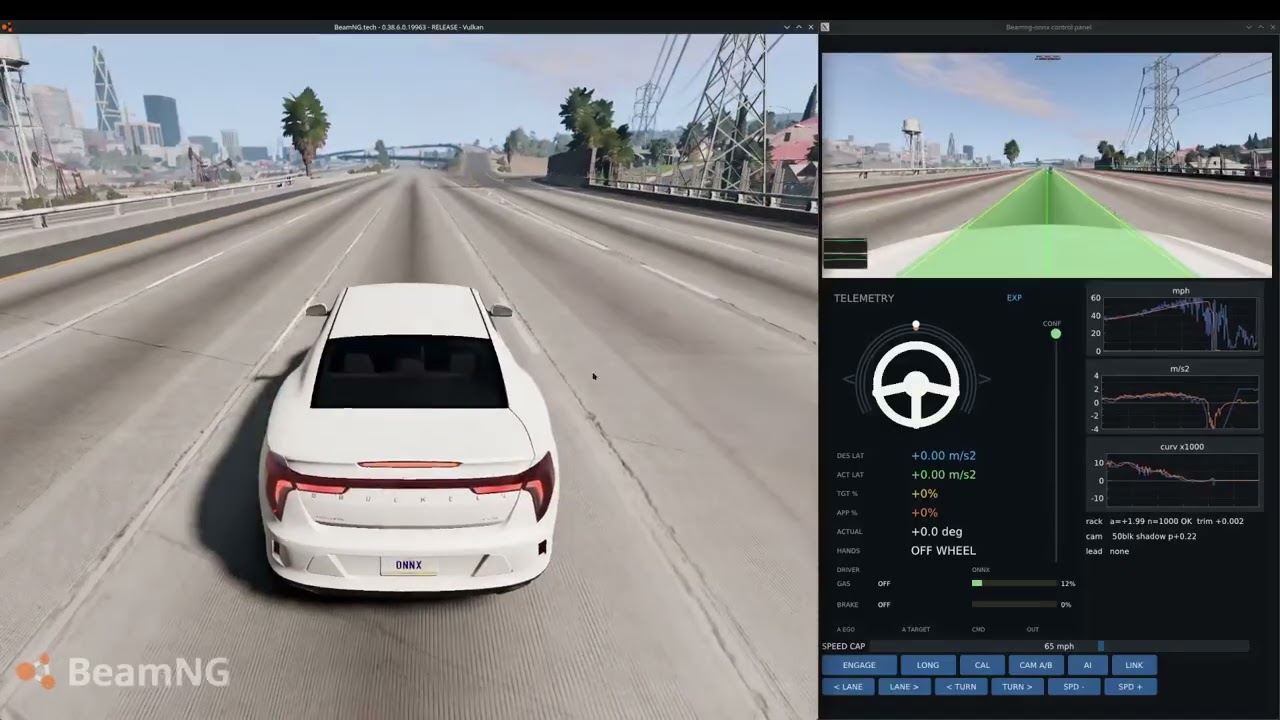
▶ Click to watch the demo on YouTube
Drive BeamNG with comma.ai's openpilot driving models — no openpilot install, just the ONNX files and onnxruntime. The model steers and works the pedals end-to-end; you watch it drive.
A Linux-only fork of 140er/simsteer rebuilt around BeamNG. Upstream drives ETS2 / Forza / Assetto Corsa on Windows; this fork keeps simsteer's model core (warp, preprocessing, decode, learners) and replaces all of the I/O. There are two ways to feed and drive the game:
| tech mode (BeamNG.tech license) | hybrid mode (any BeamNG, no key) | |
|---|---|---|
| Frames | beamngpy Camera sensor, shared-memory stream |
capture the game window (hood cam) |
| Telemetry | beamngpy Electrics (real speed) |
beamngpy Electrics (real speed) |
| Control | direct input.event steering + pedals |
direct input.event steering + pedals |
| Map / vehicle / traffic / freeroam | beamngpy scenario | beamngpy scenario (identical) |
Probed live (2026-07-04, tech.key removed): without a license the
beamngpy socket, scenario load/start, vehicle spawn, Electrics/State
and vehicle.control all work — the only tech-gated feature is
the automated Camera sensor. So hybrid mode keeps beamngpy for
everything (scenario, control, real speed, freeroam, traffic) and swaps
just the camera for a screen capture of the game window. Tech mode's
one edge is the independent Camera render (film the AI car from any
angle while it drives); hybrid's camera is whatever's on your monitor,
so set the driver view to the hood cam.
Inference runs on onnxruntime ROCm (AMD GPU) with CPU fallback.
Every 50 ms (20 Hz — the rate the models were trained at):
- Capture one wide camera frame — a beamngpy
Camerasensor (tech mode) or a grab of the game window (hybrid mode). - Warp it into the two virtual views the model expects — a narrow
(focal 910) and a wide (focal 455) crop — and pack each as the
12-channel YUV tensor at the fixed
1×12×128×256the network takes (identical to what a real comma 3 feeds; the model can't take a bigger image, so we render oversized and supersample down). - Run the ONNX driving model (a single supercombo, or a split vision+policy pair) → a plan (trajectory + speed/accel) and perception (lane lines, road edges, leads).
- Control —
simsteer/core/control.pyturns the plan into a steering angle and pedal positions, tuned to match real openpilot. - Actuate over beamngpy (
input.eventsteering smoothed to 100 Hzvehicle.controlpedals) and read back real speed fromElectrics.
The model only ever consumes the camera (plus its own recurrent state and a couple of scalars like desire and traffic-convention) — no radar, no lidar. On a real car radar is fused downstream of the model to sharpen the lead lock; here it simply doesn't exist, so lead tracking is vision-only. This camera-only diet is also why hybrid mode works: the camera is the single tech-gated sensor, and everything else runs over free beamngpy.
- M1 — model sees BeamNG ✅ verified warp geometry (vx ratio 0.995, yaw 1.028, lane width 3.82 m); lane probs peak ~1.0 driving.
- M2 — solid 20 Hz loop ✅ shared-memory frame streaming (0.13 ms/frame); GPU pipeline ~6 ms/step on RDNA4 (gfx1201).
- M3 — closed loop ✅ lateral + end-to-end longitudinal, extensively tuned against real openpilot behavior (see The control stack and What we learned).
- Hybrid mode ✅ no-tech.key path: full beamngpy scenario / control / real speed, only the camera is screen-captured (the one licensed sensor). Runs the full pipeline at 20 Hz.
- UI ✅ start panel and control panel rebuilt in dearpygui (crisp fonts, live camera texture, real plots, op-replay-clipper telemetry gauge).
- M4 — scenarios ⏳ traffic spawning works (start-panel slider); next: player-driven lead cut-ins, construction props, filming runs.
From nothing to driving on CPU (a GPU is optional — see GPU acceleration below). This works on any Linux distro, immutable ones included, with no container.
1. Clone the Linux fork (it lives on the linux branch):
git clone -b linux https://github.com/SpysyWeeb/Beamng-onnx
cd Beamng-onnx
2. Python 3.12 environment + dependencies:
uv venv .venv --python 3.12          # or: python3.12 -m venv .venv
uv pip install -r requirements.txt   # or: .venv/bin/pip install -r requirements.txt
requirements.txt is complete: numpy, opencv, beamngpy, onnxruntime,
plus dearpygui (the UIs) and python-xlib (hybrid-mode capture). CPU
inference runs the whole pipeline at ~60 Hz, so this alone is enough to
drive — no GPU, no container.
3. BeamNG — install BeamNG.drive (Steam) or BeamNG.tech. Any recent
version; you do not need a tech.key (hybrid mode covers that). The
start panel auto-detects the common Steam paths, or you type the install
directory in.
4. Models — the driving models ship with the repo under
models/supercombo/ and models/split/, so there's nothing to fetch
for a normal setup. The one exception is the 1.76 GB big model, which
is too large for GitHub — grab it separately only if you want it (see
Models below).
5. Run:
./start.shPick your options and press START. On CPU that's the entire install — no container, no GPU setup.
Models live in two typed folders, and the start panel reads each one:
models/supercombo/— single-file supercombo models (openpilot master):CD210_driving_supercombo.onnx,Deep_rl3_driving_supercombo .onnx,Toby_rl_driving_supercombo.onnx(and, if you fetch it,big_driving_supercombo.onnx).models/split/— matched vision + policy pairs (openpilot 0.11.x):<NAME>_driving_vision.onnx+<NAME>_driving_policy.onnx(e.g.POP_driving_vision.onnx/POP_driving_policy.onnx, plus the basedriving_vision.onnx/driving_policy.onnx).
Filenames use a name-first convention, <NAME>_driving_<type>.onnx,
so the release/experiment name sorts to the front. In the start panel the
Link toggle (between the vision/policy dropdowns) keeps the pair on
the same name — the halves are trained together, so mixing names usually
won't run. Output layout is read from each file's own metadata, so
checkpoint swaps need no code changes, and you can browse to any .onnx.
The seven smaller models are committed to the repo. The big model
(big_driving_supercombo.onnx, comma's USB-eGPU model, 1.76 GB) is
not — it's over GitHub's 100 MB/file limit, so fetch it separately into
models/supercombo/ if you want it. It's the only one with a real
action head (a trained, smoothed accel/curvature output) but needs
the game's graphics turned down to hold 20 Hz; the smaller supercombos
(CD210, Deep_rl3, Toby_rl) hold 20 Hz easily.
comma's weights come from GitLab (gitlab.com/commaai/openpilot-lfs),
not GitHub — pull the pointer from raw.githubusercontent, then resolve
the file through the GitLab LFS objects/batch API.
CPU is the default and is plenty (~60 Hz). For AMD-GPU (ROCm) acceleration there are two cases:
On a normal (mutable) distro — Ubuntu, Arch, regular Fedora, … — install ROCm on the host and swap the runtime:
uv pip uninstall onnxruntime
uv pip install onnxruntime-rocm==1.22.2
plus the ROCm 6.4 runtime libs (hipblas rocblas miopen-hip hip-runtime-amd hipfft hipsparse hiprand rocrand rccl roctracer hipsolver rocsolver rocfft from repo.radeon.com), then
echo /opt/rocm/lib | sudo tee /etc/ld.so.conf.d/rocm.conf && sudo ldconfig. It falls back to CPU automatically if anything is missing —
./start.sh is unchanged.
On an immutable/atomic distro — Bazzite, Silverblue, Kinoite, … — you can't install those ROCm libs onto the host, so they go in a distrobox: a mutable container that shares your home directory. The game and start panel still run on the host; only the control panel (the model runner) runs in the container, talking to BeamNG over the local beamngpy socket.
# uv keeps Python under ~/.local, so the SAME .venv runs from both the
# host and the container (they share your home dir)
uv venv .venv --python 3.12 && uv pip install -r requirements.txt

# a mutable box to hold ROCm + the GPU runtime
distrobox create --name onnx-runner --image ubuntu:24.04
distrobox enter onnx-runner
#   inside: install the ROCm libs above + `uv pip install onnxruntime-rocm`
exit
Then point the start panel at the box by adding one key to
launcher_beamng.json (created on first run) — this is the only
difference from the host setup:
"panel_cmd_prefix": ["distrobox", "enter", "onnx-runner", "--", "bash",
  "-c", "cd ~/Beamng-onnx && exec .venv/bin/python3 tools/control_panel.py \"$@\"", "--"]
If you run on CPU, or on a mutable distro, ignore all of this — leave
panel_cmd_prefix unset and everything runs on the host. The distrobox
is only the intersection of "immutable OS" and "want GPU"; nothing in the
code requires it.
Easiest path — the start panel:
./start.sh # (or: python tools/start_panel.py)It auto-detects your BeamNG install and tech.key and reshapes itself:
- tech.key present → pick map, vehicle, and traffic. It launches
the game with the tech server, waits for a real beamngpy handshake
(not just the open port), then starts the control panel.
west_coast_usaruns the scripted scenario at the calibrated spawn; any other map uses freeroam interception — load it in-game, enter a car, press START and the model hooks that car. - no tech.key → hybrid mode. Same map / vehicle / traffic / freeroam options as tech mode (they all run over beamngpy); you additionally set the hood-cam FOV. It boots the game, waits for the beamngpy handshake, then starts the control panel with the camera coming from a screen capture. Set the driver view to the hood cam.
Both spawns are detached, so closing the launcher (it auto-closes ~3 s
after START) never takes down the game or panel. The control panel logs
to debug_out/control_panel_last.log.
Manual pieces:
bash launch_beamng.sh                       # host: BeamNG + tech server

python tools/control_panel.py               # tech mode, scripted west_coast_usa
python tools/control_panel.py --attach      # hook the car already in-game
python tools/control_panel.py --hybrid --fov 100  # no-key: beamngpy + screen camera
python tools/control_panel.py --model models/big_driving_supercombo.onnx
python tools/control_panel.py --split --vision <v.onnx> --policy <p.onnx>
python tools/control_panel.py --classic     # legacy hand-drawn cv2 UI
python tools/live_view.py --supercombo      # overlay viewer; drive manually
Controls (panel buttons or keys): e engage · l long-mode cycle
(EXP / CHILL / OFF) · a/d lane-change L/R · z/c turn L/R ·
r CAL · v camera-calib A/B · speed-cap slider or -/=.
The model outputs a plan (trajectory + velocity/accel) and perception
(lane lines, road edges, leads). simsteer/core/control.py turns that
into steering and pedal commands, tuned to match how real openpilot
behaves.
Lateral — feed-forward from the plan's desired curvature through a measured rack model, then executed at ~100 Hz:
- Rack fit (
axis = a·wheel) is a measured constant from the CAL routine (a scripted steering system-ID), not an online learner — the sole exception is hybrid freeroam, where CAL's teleport isn't available (a car with a prior CAL loads its constant; otherwise it learns the rack live while engaged). - Understeer feed-forward: the wheel target scales
(1 + kv·v²)because tire slip grows with speed; fit from logged in-curve delivery (0.96 at city speed → 0.74 at highway). - 100 Hz steering executor: the model plans at 20 Hz but a separate thread actuates the wheel at ~100 Hz (openpilot's modeld/controlsd split), smoothing between plan updates instead of staircasing.
- Rate limiter only — the ISO curvature/lat-accel magnitude clamps are off by default (the sim's tires are the real limit); the ISO-jerk rate limiter (with faster unwind) shapes how fast the wheel turns.
- Corner scanner for entry speed: the plan's own upcoming curvature
sets a comfort-bounded safe speed (
sqrt(a_lat_max/κ)). The model plans its own turn speed; we no longer override it with a fixed intersection governor (that was compensating the speed under-read, now fixed at the source).
Longitudinal — follow the plan's velocity/accel through measured pedal maps, with corrections that mirror the real model's envelope:
- Pedal maps are measured interpolation tables (throttle/brake vs commanded accel), since sim pedal response saturates and isn't affine.
- Sim-scale speed correction (the big one — see below): the plan
velocity is scaled by the model's live
v_ego / pose_vbecause a high camera makes the model under-read its speed. It's a per-vehicle calibration value now — persisted per car and warm-started, since it's driven by camera height (the bastion barely needs it, the tall pickup needs ~1.14). - E2E decel envelope: off by default. It floored open-road decel to soften phantom hard-stops, but those came from the speed under-read (now fixed at the source), so it's redundant; the gated mechanism stays for a one-value re-enable if the model ever brakes too hard.
- Integral speed-trim, gated to steady cruise; a minimal openpilot-style stop-hold (brake ramp that releases when the plan wants speed).
Best-effort principle: like real openpilot, the controller does not intervene on low vision confidence — it drives on whatever the model outputs and the driver (you) is the fallback. There is no "lost-road" safety stop.
The interesting findings, most impactful first — most were nailed by decoding real comma connect route logs and comparing them to sim runs frame-by-frame.
- Traffic convention was inverted. The model was being told it
drove on the left (UK). On US maps that reads as "permanently in
the oncoming lane" → left-lane bias, defensive phantom stops, launch
hesitance. One-hot fix (
tc[int(is_rhd)]=1, so US =(1,0)) turned 20 mph timid crawling into 54 mph steady cruise. This was the single biggest behavior fix. - The speed under-read is camera height, not world scale. A tall
camera under-reads speed: ground optical flow scales as
v/h, so the model (trained near ~1.2 m) reads a true 55 mph as ~48 from the pickup's 1.95 m mount (pose_v/v_ego≈ 0.88), while the bastion at 1.30 m reads it right (0.995). The spatial scale is fine — lane width 3.82 m vs 3.7 m, yaw 1.028 — so this is the only perception axis that's off, and it's per-vehicle. The model has no speed input, so in e2e it plans at its perceived-low speed and the controller brakes to a phantom stop (exactly why e2e never reached speed while chill mode did). Fixed by scaling the plan velocity by the model's own livev_ego/pose_v, now persisted as a per-vehicle calibration. - "Confidence" doesn't gate stopping.
modelV2.confidenceis a RED/YELLOW/GREEN disengage-alert enum; on a smooth real drive it read "red" 95% of the time while never stopping, and lane confidence dropped to ~0 without stopping either. What keeps the real model smooth is a perfect speed estimate and a plan that never dips — not a confidence signal. - Camera resolution drives low-speed vision. Bumping the render 1664×832 → 2496×1248 (supersampling the model's warp like a real camera) raised lane confidence at 1-3 m/s from 0.26 to 0.75 and killed the "won't-commit crawl."
- Steering timing, measured not guessed. Command→response lag is ~0.30-0.35 s (cross-correlated from logs); the lead is matched to it, plus a small deliberate turn-in-early bias, which cured the "hugs the outside of curves then gets thrown across the lane" complaint.
- The big model has an action head; CD210 doesn't. The real car's smoothness partly comes from a trained, gently-bounded acceleration output. CD210's action slot is padding, so we derive accel from the plan, which is choppier — so if CD210 ever brakes too hard on open road, the (now-off) decel envelope is the intended remedy.
- Gore points confuse E2E without navigation. At road forks the model doesn't commit to a branch and drifts toward the dirt divider, then correctly slows because its path leaves the pavement. Real openpilot solves this with nav input (a bigger project); we mitigate by preferring continuous-highway routes.
beamng/world.py (VEHICLE_SPECS) holds per-vehicle camera mount,
height, wheelbase, and part config, plus per-vehicle state files so one
vehicle's calibration never bleeds into another's.
- bastion (sedan) — the measured-and-tuned sedan (camera ~1.30 m).
- D-Series (truck) — the Gavril D-Series crew-cab 4×4 automatic
(its beamngpy model name is
pickup). Camera at the windshield glass, measured 1.95 m above the road.
simsteer's docs/ARCHITECTURE.md still describes the model core accurately (what's a comma port vs simsteer's own). SETUP/TUNING are Windows-specific and don't apply here.
MIT, same as upstream. Models are comma.ai's.