Web Teacher Guide
This guide walks you through Classroom 50's web app at classroom50.org, in the order you'll use it to run a course. Prefer the terminal? See the CLI Teacher Guide.
The path: set up a GitHub organization → sign in → run one-time setup → create a classroom → create assignments → add students → share accept links → collect submissions.
Tip
Have feedback, a bug, or an idea? Raise it in the project's discussions.
Classroom 50 stores its state in GitHub; there are no Classroom 50 servers. Your classroom data lives in a GitHub organization, and rosters and submissions live in a repository inside it.
You need:
- A GitHub account.
- A GitHub organization on the Team or Enterprise plan. Classroom 50 relies on Team-plan features like GitHub Pages and branch protection.
Note
Verified educators can get Team-tier organizations free through GitHub Education.

At classroom50.org, sign in with GitHub using OAuth 2. Two options:
- Sign in with GitHub — the standard browser flow.
- Use a device code instead — a manual fallback. Paste a code into a GitHub page, and Classroom 50 detects when you've authorized it.
When authorizing, grant access to any organization you'll use with Classroom 50. If you don't own the organization, you may need to request access and have an owner approve it in the organization's OAuth settings. If an organization you belong to is missing later, see My organization doesn't appear.


After signing in, you'll see the organizations you can use:
- An organization that's set up shows an Open button. A token chip appears when the service token needs attention (for example No service token or Token expired) because score collection needs a valid token.
- Organizations that aren't set up yet appear under Set up new organization, each with a Set up button.
Don't see your organization? GitHub only reports organizations you've granted Classroom 50 access to — see My organization doesn't appear.

Click Set up on an uninitialized organization, then Run setup. This
configures your organization's settings and creates a classroom50 repository
to hold Classroom 50's state.
When step 1 is complete, continue to step 2 to add your service token.
The service token is a fine-grained personal access token (PAT) scoped to
your organization, used by the score-collection, regrade, and token-probe
workflows to read student repositories (and push regrade tags) across the org.
The form and the
pre-filled GitHub page set up the required permissions for you; the full
permission table is in
GitHub Integration.
Classroom 50 stores it as the CLASSROOM50_SERVICE_TOKEN secret in your
classroom50 repository, where the score-collection workflow uses it.

Classroom 50 sends you to GitHub to create the token, then you paste it back into the form to finish setup.

Open a set-up organization from its card, or visit
https://classroom50.org/<ORG>, to see its classrooms.
Note
A classroom holds a group of students and their assignments. An organization can have many classrooms — for example, one per class period or term.
On My classrooms, click Create classroom:

- Name — the classroom's display name.
- Slug — a unique identifier used in URLs and repository names, auto-filled from the name (letters with diacritics transliterate, so "Álgebra" becomes "algebra"). At most 40 characters: the slug prefixes every student repository name, and GitHub limits repository names to 100 characters.
- Term (optional) — shown in various places to distinguish course offerings.

Use an unlisted link for this classroom (optional) publishes this classroom's assignment data at an unguessable URL instead of a predictable one based on the slug.
Warning
Unlisted links are obscurity, not access control. The files are still public; anyone with the link can read them.
After creating, you'll get a URL of the form
https://classroom50.org/<ORG>/<CLASSROOM> to view your new classroom.

Note
Behind the scenes, this adds a subdirectory to your classroom50 repository
holding the classroom's roster and assignment list.
If TAs or co-teachers help run the classroom, add them before students arrive: open the classroom, click Settings, and use the Staff and roles section. For the four roles, what each can see, and how to structure multi-teacher setups, see Staff, TAs, and multiple teachers.

On the classroom page, click + Assignment. Fill in:
- Name — the assignment's name.
-
Assignment slug — the identifier used in student repository names,
auto-filled from the name (diacritics transliterate, the same as classroom
slugs). The classroom slug and the assignment slug together can spend at
most 59 characters, so
<CLASSROOM>-<ASSIGNMENT>-<USERNAME>stays within GitHub's 100-character repository-name limit for any username. If you edit the slug, the form warns as you type when it is over that budget or collides with an existing assignment. - Description (optional) — details for students.
- Due date (optional) — a date and time in your local timezone. A due date marks later submissions late in the collected scores; it does not block pushes or revoke access. To actually close an assignment, use the Close submission action (see below).
- Assignment type — Individual (one repository per student) or Group project (students share a repository and submit together).
How each student's repository is created:
-
Start with a template — No template or Template repository: a
template repository
used as each student's starting point. Search your organization's template
repositories by name, or paste
OWNER/REPOSITORY(or a full GitHub repository URL) for a template the search doesn't list. See Assignment Templates for requirements. -
Add a README (no-template assignments) — whether the repository starts
with an initial commit. With it off, what students get depends on the
built-in autograder choice under Submission and
grading:
- autograder off → a truly bare repository: no commit, no autograding, and no feedback pull request (permanently, not only until the student's first commit). Use it when students build everything from scratch, including their own GitHub Actions.
- autograder on → an initialized repository carrying only the control files (no README, no starter content) that grades normally.
- Include all branches (templated) — copy all of the template's branches into each student repository, not only the default branch. Useful for multi-branch template repositories.
- Feedback pull request — automatically opens a pull request per student so you can review changes and leave inline feedback.
The rest of the repository settings sit under Advanced settings in this section — most assignments never need them:
- Copy About from template / Copy topics from template (templated, both on by default) — carry the template's About description and topics over to each student repository (GitHub's template-generate doesn't copy them on its own). Applies when students accept in the web app.
-
Use the template's pull request template as the Feedback PR body
(templated, with the Feedback pull request on) — use the template repository's
own pull request template (
.github/pull_request_template.md,pull_request_template.md, ordocs/pull_request_template.md) as the body of each student's Feedback PR instead of the built-in text. The form auto-checks this when it finds such a file in the template; you can still toggle it. If the file is missing or can't be read, the built-in body is used, so nothing breaks. It is your responsibility to keep the template's contents correct. - Student repo access — the role students get on their own repository.
- Repository features — per-feature settings for Issues, Wiki, Projects, and Pull requests on student repositories. The default, Inherit from template, re-applies the template's current setting at accept time (again, GitHub's generate doesn't copy these); you can force any feature On or Off instead. Template-less assignments default to GitHub's own defaults. To update repositories that already exist, use the Update repository features action on the submissions page.
Note
These settings can be changed after creation, but only affect repositories accepted from now on — repositories students already accepted aren't retrofitted, so they keep their original starter code and setup. When at least one student has already accepted, the edit form asks you to confirm and warns that you'll need to update the existing repositories yourself. (Assignment type — Individual or Group — is the exception: it stays locked on edit, because switching it would invalidate every existing submission.)
- Grading — Not graded (the default), Autograded, or Manual (enter scores by hand). The autograding options below appear only under Autograded; Manual assignments get a Max points field and you enter each student's score on the submissions page (see below). Can be changed after creation (edits only affect repositories accepted from now on).
- Built-in autograder — under Autograded, choose Use the built-in autograder (preselected when you switch to Autograded) or Do not use the built-in autograder. Opting out means accept installs no autograding workflow at all: on a templated assignment your template's own CI workflows run instead. The submissions page still shows who submitted (collection records submitters, but no scores), and the repository actions stay available. Your choice sticks — leaving Autograded and coming back won't reset it. Can be changed after creation (edits only affect repositories accepted from now on; turning autograding off later makes already-accepted repositories' autograde runs fail and drop out of the collected scores).
-
Submission type — when the autograder runs, and what the submissions
page counts. Every push to the default branch (the default) grades each
push and counts each student commit on the branch (the tool's own accept and
autograding-update commits are excluded), so a push of several commits is
graded once but counted several times. A tagged commit grades and counts
only when a student submits (
gh student submit) or pushes asubmit/*tag — regular pushes cost no Actions minutes, which matters at scale. -
Submission tags (optional) — tag names such as
phase1,phase2,complete) that also trigger grading. A student pushes the tag with plain git (git tag phase1 && git push origin phase1) and that commit grades; the result appears as a normalsubmit/*release titled "via phase1". Prefer exact names — a broad glob likev*grades every matching tag. Changing them later requires the same trigger update as the mode (see below).
A collapsed Advanced settings section, below the autograding tests in the form, holds optional settings for customizing the autograding environment:
-
GitHub runner — the runner
autograding runs on.
ubuntu-latestis a good default. - Docker image — grade inside a custom Docker image. The runner must be an Ubuntu variant, or Actions errors.
- Setup command and timeout — a shell command run before the other tests. Use it to compile code or install dependencies. New setup commands start at 120 seconds; choose 0 for the runner's 10-second default or a whole number from 1 through 600.
-
Allowed files — a
.gitignore-style list controlling which files remain for setup and grading. Include dependency manifests and project files used by setup. - Submission release files — exact workspace-relative file paths (one per line) to attach to each submission's Release after grading. Paths are not globs; basenames must be unique and Release-safe. Missing or unsafe files are skipped with a warning.
Note
Existing organizations must refresh the shared workflow files (re-run setup) before using submission release files. Submission publishing doesn't support GitHub Immutable Releases. See Autograders for path rules and limits.
Commands run in separate shell processes. See Autograders for dependency installation and environment-variable guidance.
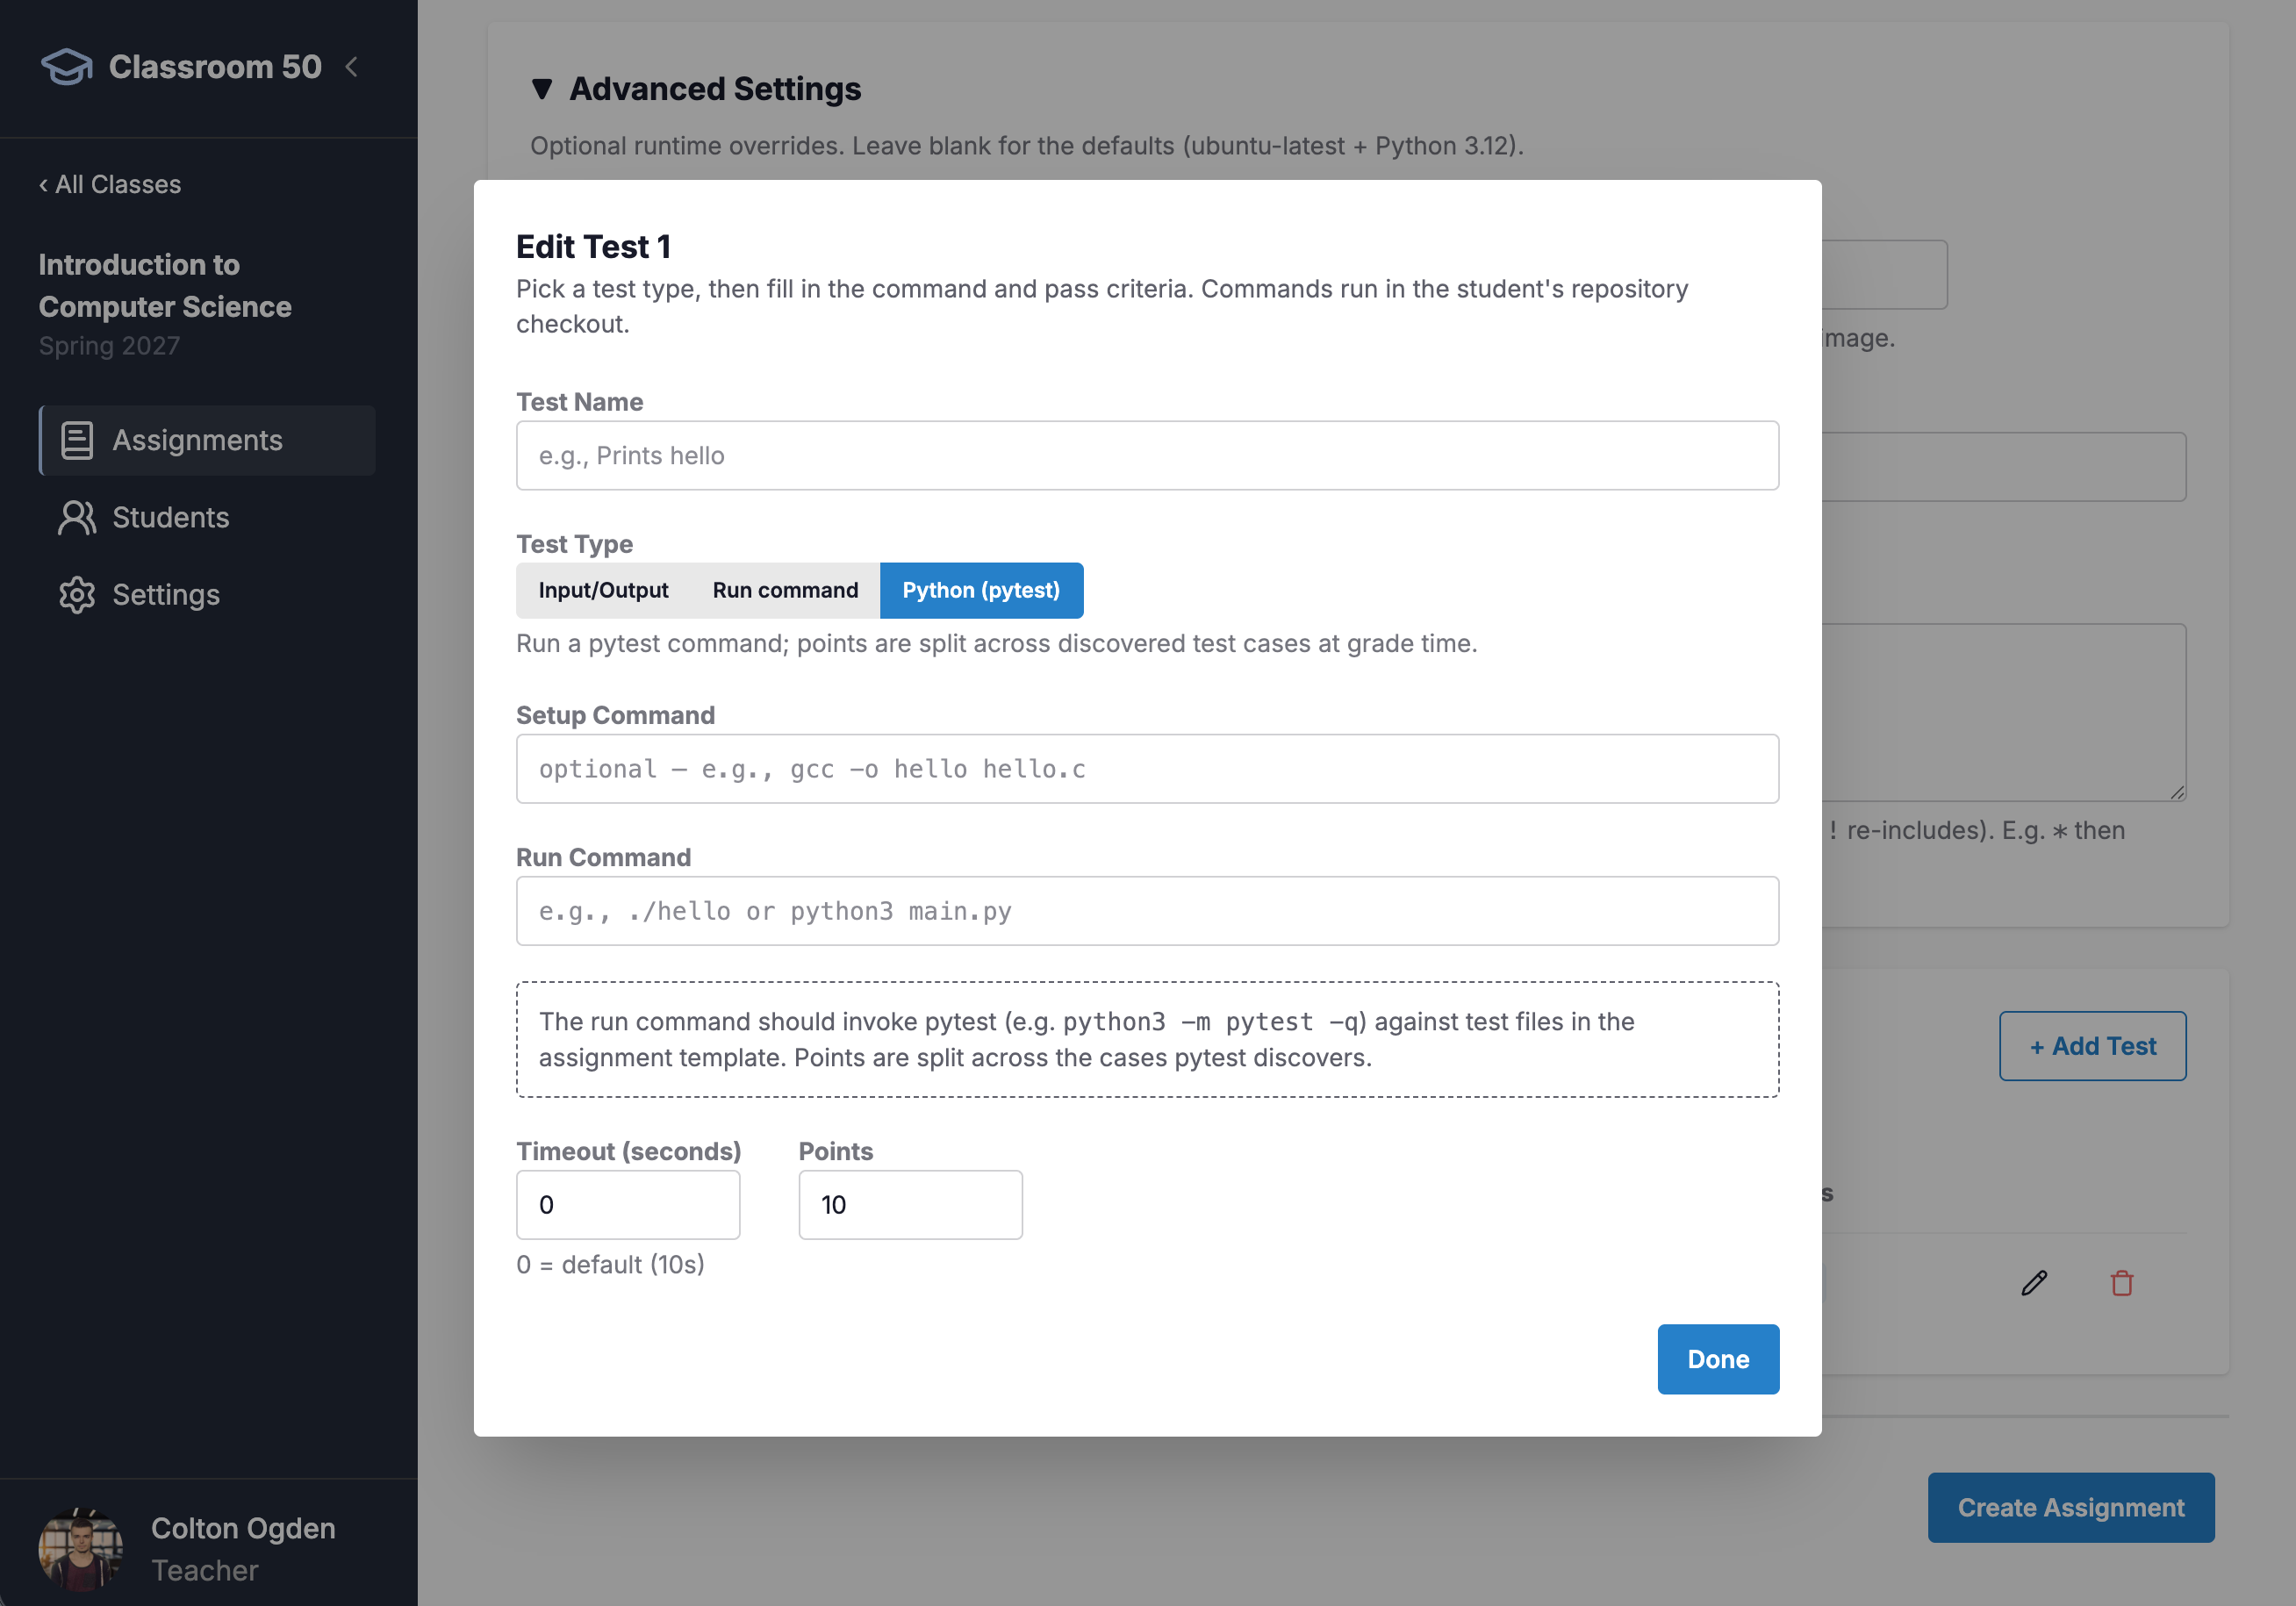
Autograding tests run whenever a submission grades (per the assignment's submission type). The list collapses to keep the form scannable; click its heading to expand it, or Add test to add one (saving a test expands the list automatically).

Each test has:
- Test name — shown to students to indicate what passed or failed.
- Test type — Input/Output, Run command, or Python (pytest).
- Setup command — an optional command run before the test.
- Run command — the command the runner executes.
- Timeout (seconds) — how long to wait before terminating the test.
- Points — the test's weight.
The three test types add their own fields:
Input/Output — provide input and check the output.
- Input (stdin) — text sent to standard input.
- Expected output — text to check for in standard output.
- Comparison — Included (expected appears somewhere in the output), Exact (output equals expected), or Regex (output matches a pattern).
Run command — pass when a command returns a given exit code.

- Required exit code — the exit code needed to pass.
Python (pytest) — runs pytest against test files in the template. No extra
fields.
When you're done, click Create assignment.

Students must be on the classroom roster before they can accept assignments.

On a classroom's Roster page, add students and see who has joined and who has a pending invitation. Adding a student sends them an invitation to join your GitHub organization.
Important
Students must accept the organization invitation before they can work on assignments.
Add member — add one student by GitHub username (name and email optional). You can enter an email instead of a username; that student then completes a separate onboarding process (see below).
Upload — bulk-add students from a file. Roster CSV is how every upload is read, and it handles all three shapes; the other two entries in Read the file as are overrides that force one interpretation:
- A roster CSV: a header row plus one student per line. See the fields and example below.
- A plain list: one GitHub username or one email address per line, no header. Each line is read for what it is, so a mixed list works.
- The overrides: choose GitHub usernames to read every line as a handle even if it looks like an address, or Email addresses to read every line as an address and no columns at all. Either one is you telling the app what every line is, so a line that doesn't fit is reported rather than read the other way.
If any row carries a value the upload can't use — an address that isn't valid, a
github_id matching no account, a line that's neither a handle nor an address —
it lists those rows with their line numbers and imports none of them. Fix the
file and upload it again; re-uploading is safe, because students already in the
classroom are left alone. That check covers every identity column independently, so
a shifted column is caught even when the row's other cells look fine. The one
exception is a row with no identifying column at all, usually a student who hasn't
given you a GitHub account yet: that row is reported and skipped, and everyone else
is imported.
Each row needs at least one column that identifies a student: github_id,
username, or email. Every other column is optional. Headers are matched
case-insensitively, and any unrecognized column is ignored, so a CSV exported
from your SIS or gradebook usually works unchanged. Save the file as UTF-8
when you can (Excel's CSV UTF-8 export); a file that isn't is read as
Windows-1252 — Excel's plain "CSV" export — and the upload shows a notice so
you can check that accented names survived.
When a row has more than one, they're used in that order — github_id first,
then username, then email:
| Column | Identifies a student | Description |
|---|---|---|
github_id |
Yes, first choice | The account's immutable numeric id, as written by Classroom 50's own roster.csv. Used to look up the account's current username, so a student who renamed their account is still found. |
username |
Yes, if there's no github_id
|
The student's GitHub username, such as octocat. |
email |
Yes, if there's neither | Invites the student by email. Also stored as their contact email on every row. |
first_name |
No | Given name, for display and score exports. |
last_name |
No | Family name, for display and score exports. |
name |
No | Full name in one column, split into first/last. Use instead of first_name/last_name. |
section |
No | A section or group label you can filter by. |
role |
No |
student (default), ta, hta, or teacher. Leave blank for students. |
Note
If a row's github_id and username disagree, the upload uses the account
the id belongs to and asks you to confirm before importing — the preview shows
both, and the roster's stored username is corrected to match. An id that
doesn't match any GitHub account stops the import rather than falling back to
the username, since the username could belong to someone else entirely.
A complete roster CSV looks like this:
| username | first_name | last_name | section | |
|---|---|---|---|---|
| octocat | Mona | Octocat | octocat@example.edu | A |
| hubot | Hu | Bot | hubot@example.com | A |
| octofez | Octo | Fez | B |
As a plain text file:
username,first_name,last_name,email,section
octocat,Mona,Octocat,octocat@example.edu,A
hubot,Hu,Bot,hubot@example.com,A
octofez,Octo,Fez,,B
A single username column is also valid:
username
octocat
hubot
octofez
So is a file that identifies some students by account and others only by email — useful at the start of term, when not everyone has reported a GitHub username:
github_id,username,email,first_name,section
583231,octocat,octocat@example.edu,Mona,A
,hubot,,Hu,A
,,octofez@example.edu,Octo,B
Here octocat is found by id (even after a rename), hubot by username, and
octofez is invited by email and appears as a pending row until they accept.
Note
A row identified by account (github_id or username) is both invited and
added to the roster. A row identified only by an email address is invited by
email, and the address is recorded as a pending roster row. That row is matched
to the student's GitHub account when they accept; if you cancel the invitation
the row is removed with it, and an expired one is cleared by the next sync,
from either tool. The recorded address is the one you invited, not
necessarily the email on the student's GitHub account. A name and section
supplied in the CSV are kept on the pending row, so they're already there when
the student joins, and you can correct them from the row while the invitation
is still pending. The address itself can't be changed there, because it
identifies the invitation: to use a different one, cancel and invite the new
address.
A pending row is why the stored roster.csv can hold a row with no username
or github_id. Either tool reads that file back: Upload matches those rows
by email, and gh teacher roster import corrects a pending row's name and
section by address without touching the invitation. A row identified only by
github_id is the exception, since import resolves students by username: it
skips that row with a notice and leaves whatever is stored for it alone. For
more information, see
Invitations by email.
Tip
Adding students who are already in your organization (for example, from a previous course) is a different action. Inviting them again does nothing: GitHub reports "Already a member," and it won't put them on this classroom's roster. To enroll an existing member, open the organization's Members page in Classroom 50 and use Add to classroom (per member, or select several for the bulk action). See Already an org member, but not on the roster.
The roster list — everyone already in this classroom. Classroom 50 gives you two shareable links: one to accept the organization invite, and one to onboard students added by email. Neither link enrolls anyone on its own: invite the student from the roster first, then share a link so they can accept and sign in. Below the links, each student's status shows whether they've joined the organization.

Once an assignment exists, share its accept link with students: expand the How students accept panel and copy the URL. To grab the same link without opening the assignment, use the link icon in the assignment's row on the Assignments page — it copies the accept URL straight to the clipboard, including the access key when the classroom uses an unlisted URL. When a student opens the link, they're taken to the accept page:

Accepting creates a repository named <CLASSROOM>-<ASSIGNMENT>-<USERNAME>.
Pushing to it triggers autograding, which builds a Release containing a
result.json file. The score-collection workflow (run on demand)
aggregates those results into the classroom's scores.


Scores update when collection runs: click Collect now in the freshness
strip at the top of the submissions page (the Actions menu carries the same
Collect now). Both are scoped to the current assignment — they walk
only this assignment's repositories, so a collection is fast even in a large
classroom and doesn't rebuild other assignments' scores. The strip shows when
this assignment's data was last collected (a per-assignment collected_at
stamp in scores.json), and an Out of date badge appears beside it when
students have pushed since that collection — collect to grade and score the
newest work. Click
View workflow to see the Actions run. To refresh every assignment in one
run instead, see Collect the whole classroom.
The top of the page shows:
- Submitted — submissions against students enrolled.
- Classroom average — average score among students who submitted.
- Passing — how many students are passing and how many are failing.
- Accepted — how many students accepted (one per student).
Tip
For larger classrooms, use the search box, filters ("Submitted", "On time", passing/failing, "Accepted"), and sorting (by name or submission date).
Each row shows a student's (or group's) latest submission plus its full history (newest first). For each submission you can view the score, the submission date, and links to the repository, the commit, the feedback pull request (View feedback PR on the row; its manage dialog carries the same link as Review), and the Release (View autograder details). For where every result lives — per-test breakdowns, past attempts, grading a specific commit, and who submitted — see Reading results in Autograding Basics.
The classroom's assignments list refreshes all scores in one run. Above the
table, a freshness line shows when the classroom's submission data was last
collected, next to a Collect all button. The same Out of date badge
appears there when any assignment's repositories have pushes newer than that
assignment's last collection — each assignment is judged against its own
stamp, so one freshly collected assignment can't mask a sibling that was
never collected. Clicking Collect all dispatches a single
collect-scores.yaml run scoped to the classroom, so one run walks every
assignment and rebuilds all of the classroom's collected scores; the table's
per-assignment submission counts refresh when the run finishes.
Because the run walks every assignment's repositories, it takes longer than a single-assignment collection and uses more GitHub Actions minutes, so Collect all asks you to confirm before dispatching. To refresh one assignment while grading, prefer Collect now on that assignment's submissions page.
Any staff member can collect, the same as the per-assignment collection. The button is hidden on an archived classroom and while the classroom has no assignments, and disabled while the roster is empty. Once dispatched, the run appears in the banner at the top of the app as Collecting scores, which keeps tracking the run if you navigate away and links to the Actions run (View run).
Each row's score cell has an edit button (pencil) that opens a score dialog. It works for both grading modes:
- Manual assignments — enter a score out of the assignment's Max points.
- Autograded assignments — enter a score to override the autograded result. The autograded score is preserved and shown in the dialog; Clear override restores it. If the submission hasn't been autograded yet, the dialog also asks for the max points to grade out of.
An overridden score shows a Manual badge and won't be changed by
autograding until you clear the override. Entering a score writes the
classroom50 repository's scores.json, so the editor appears only for
organization owners.
The Actions menu at the top of the submissions page operates on the whole assignment:
- Metrics — summary statistics for the assignment.
- Open all Feedback PRs — review each student's feedback pull request in turn.
- Collect now — trigger a score collection scoped to this assignment.
- Regrade all — re-run the autograder on every collected submission.
- Update student repo access — bulk-set every student's role on their repository (drop everyone to read-only for grading, then restore write afterwards).
- Update repository features — re-apply the assignment's Issues / Wiki / Projects / Pull-requests settings to every existing student repository (repositories created before a settings change, or before features were inherited from the template).
- Update autograding triggers — retrofit existing repositories after a submission-type change (see below).
-
Pause autograding / Resume autograding — disable or re-enable the
built-in
autograde.yamlworkflow in every student repository with GitHub's workflow-disable API. No files are changed, and you can resume anytime; other workflows in student repositories keep running. Use it to stop autograding for one assignment without touching the rest of the org. (Available on individual assignments that use the built-in autograder, once students have accepted; a single repository can also be paused from its row.) - Close submission / Reopen submission — close the submission window: block new accepts and set every student's repository to read-only (work is preserved). This is the enforcement mechanism for due dates — the due date itself only marks submissions late. Reopen submission restores write access.
- Lock assignment / Unlock assignment — lock the assignment so students can't access or accept it (and, for a private template, remove the student team's read on it); unlock reopens it and restores template access. Useful for staging an assignment before release.
- Download scores (CSV) — export all submissions as a CSV.
-
Download all submissions — download each repository's latest submission
bundled into a single zip (built in the browser, one repository at a time;
for very large classrooms prefer
gh teacher download, which clones every repository and writes ascores.csv— see the CLI Teacher Guide). The Clone all submissions button next to the Actions menu — and the download icon in an assignment's row on the Assignments page — opens a dialog with that CLI command filled in for the assignment, ready to copy.
Click Download scores (CSV) to export all submissions as a CSV for a spreadsheet or external tool. The column-by-column reference is in Score exports in Autograding Basics.
- Manage an assignment from the list — each row on the Assignments page keeps four quick actions (copy accept link, clone submissions, edit, lock) plus Manage assignment, a dialog gathering every per-assignment action in one place: the quick four, Template access (review which teams can read the template, and re-grant the classroom teams' read), Reuse in another classroom, and Delete assignment (which asks you to type the slug to confirm; student repositories are kept).
- Edit an assignment — open the assignment, then Assignment settings. Same form as creating one, pre-filled. Provisioning settings (repository source, built-in autograder, grading mode) are editable; a change only affects repositories accepted from then on, so the form asks you to confirm when students have already accepted. Assignment type (Individual or Group) stays locked, since switching it would invalidate existing submissions.
- Edit a classroom — open the classroom, then Settings. Same form as creating one, pre-filled. The page also offers Clean up invite data, which clears the addresses held for email invitations that were never accepted. See Invitations by email.
An assignment whose slug can push student repository names past GitHub's 100-character limit shows a Slug too long badge in the assignments list. This affects only assignments created before the limit was enforced, such as ones imported from GitHub Classroom with long names.
- Open the assignment, then Assignment settings.
- On the Slug update needed card above the form, click Update slug.
- In the New slug field, keep the suggested slug or enter your own. A hint shows how many characters the classroom leaves room for.
- Click Update. One configuration change renames the assignment, then every existing student repository is renamed to match, with per-repository progress.
GitHub redirects the old repository names, so existing clones keep working,
and collected scores follow the new slug. You can update a slug only once:
the old slug stays permanently reserved so the redirects survive. The
assignment stays locked while repositories are renamed; if any repository
fails, the card switches to Slug update incomplete and Finish update
re-runs the renames until everything lands. Students run git pull once
before their next submit. The CLI equivalent is
assignment rename.
The trigger is baked into each student repository's autograding workflow when the student accepts, so changing the submission type in Assignment settings only affects repositories created from then on. To update repositories students already accepted:
- Change the trigger in Assignment settings and save.
- On the submissions page, open the actions menu and click Update autograding triggers. It rewrites each repository's workflow to match (the commit is marked, so it neither triggers grading nor counts as a submission), reports repositories whose workflow was hand-edited (those are left untouched), and skips students who haven't accepted. A single repository can also be updated from its row's manage dialog.
- Tell students to run
git pull— clones made before the update will conflict on their next push.
The bulk action is available for assignments using the default autograder
(a custom autograder's workflow is yours to edit) and needs your GitHub
authorization to include the workflow scope — sign out and back in if the
action reports a permissions problem.